Art

New Patterns 2023 from Net

For the last few months, I have been busy working on new designs to take to the New England Traditions painting convention. I taught one class and had a booth.

This is the design that I taught called Party Pals which is sculpted using salt shakers

Since I was having so much fun with them, I decided to do a Christmas set called Christmas Pals

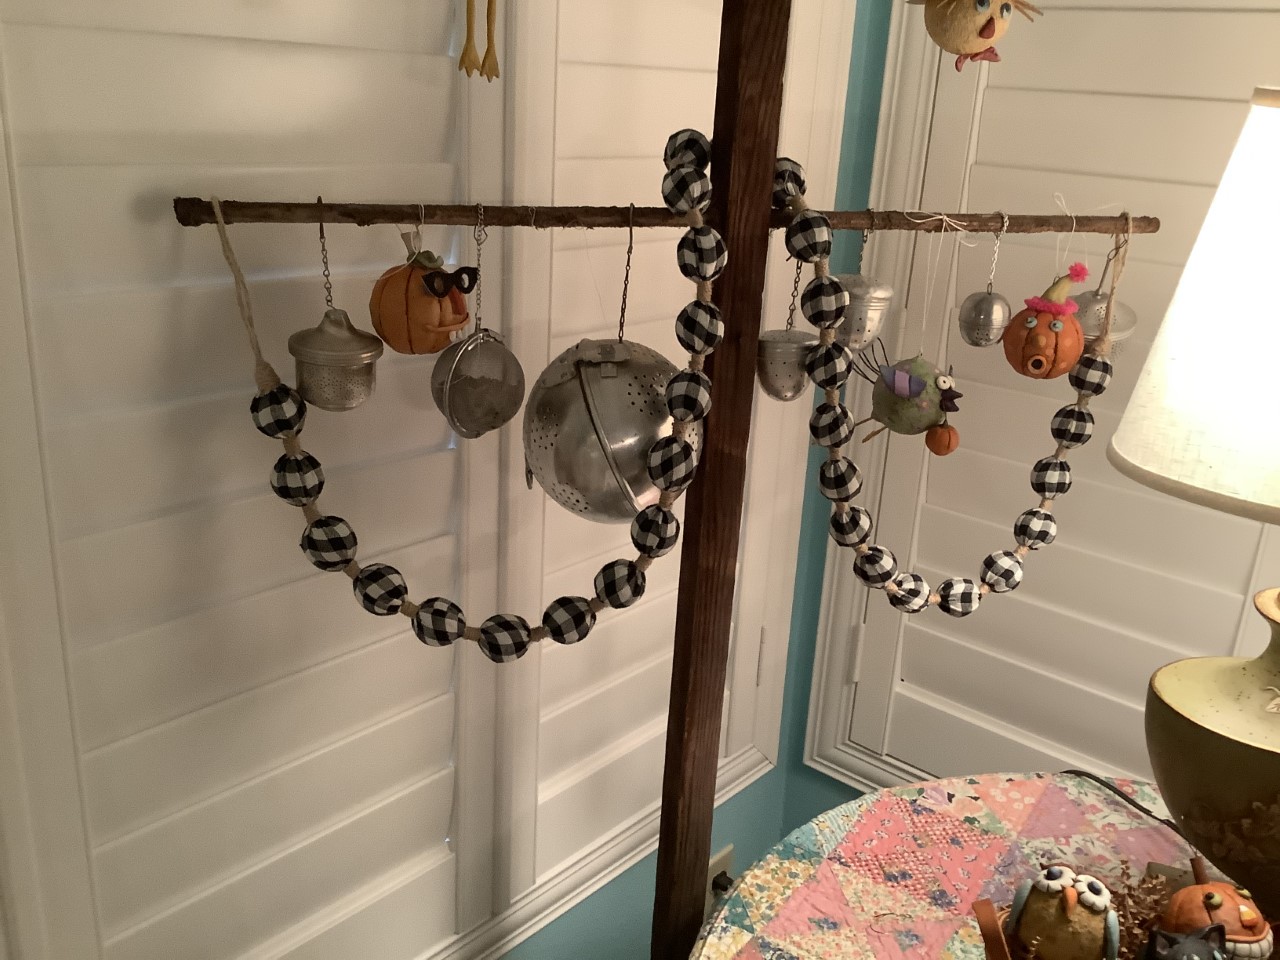
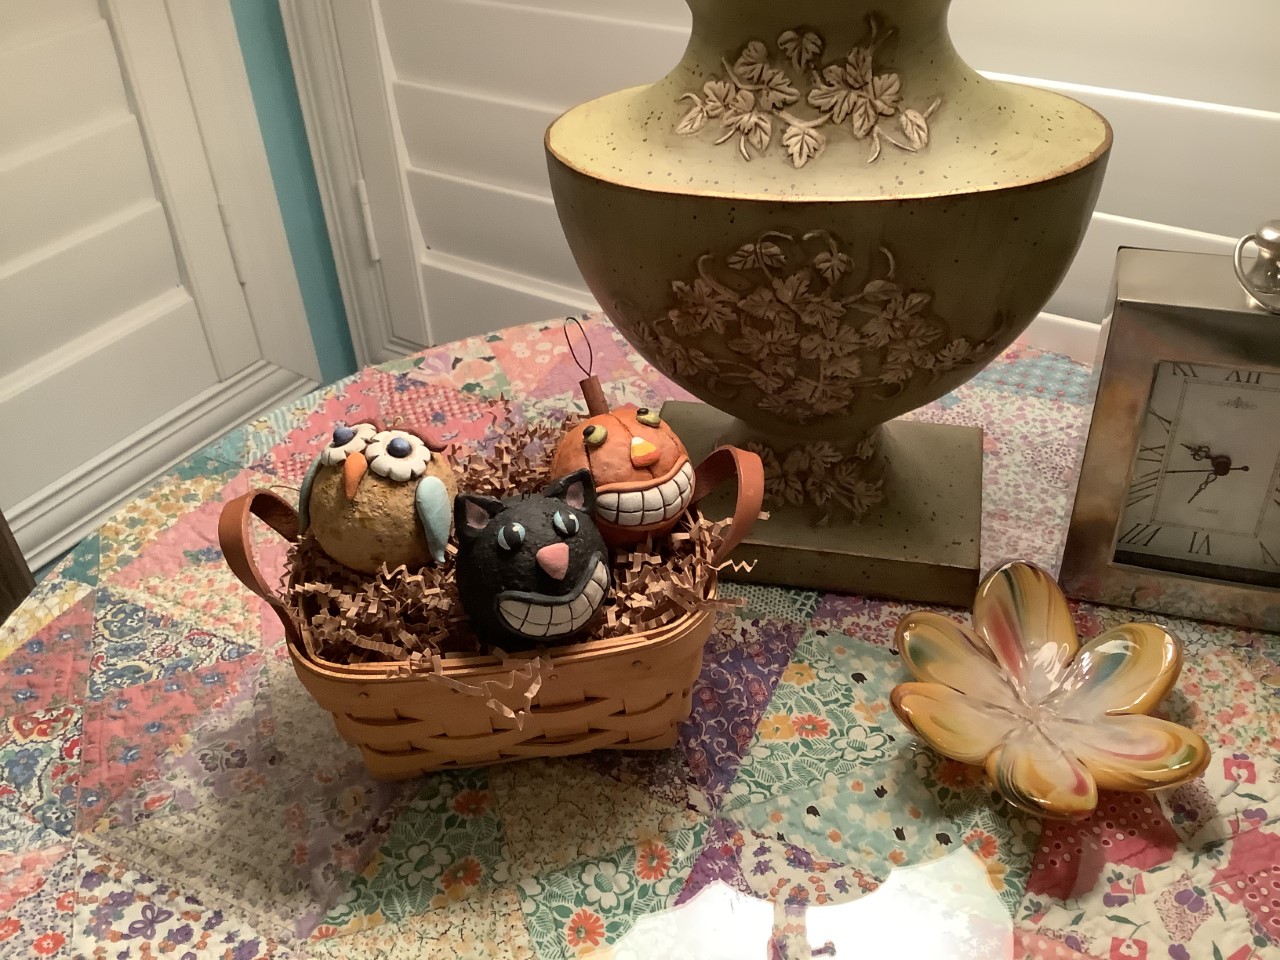
Since we are fast approaching fall, I thought I would have a couple new fall designs. Meet Pumpkin Patch Friends and Hello Kitty. The Pumpkin Patch Friends are sculpted on wooded pumpkin from DePalmas Custom Woodcrafts.

I just love Hello Kitty, and she is a little wired from too much caffeine.

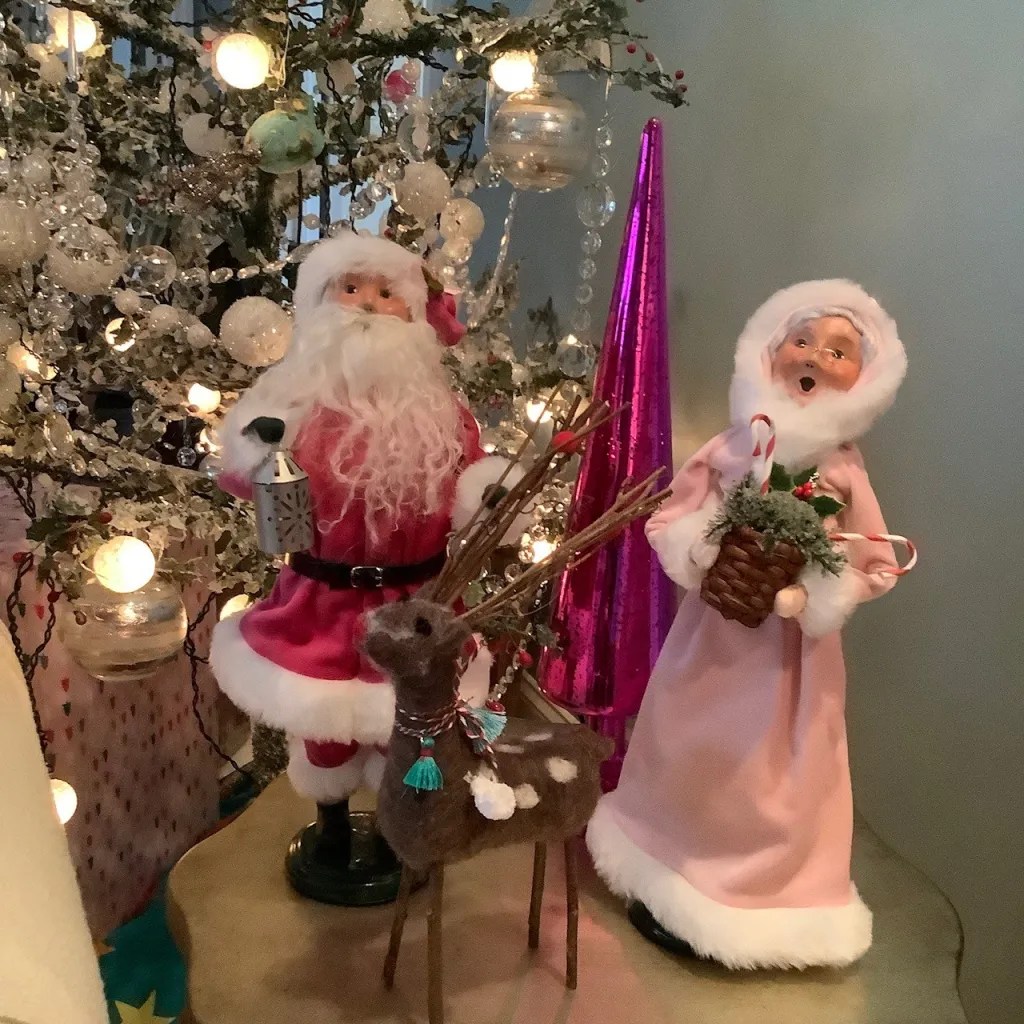
I always love doing Christmas. These 5 Guy Santa’s are sculpted on turned ornaments from Depalma’s.

If you are looking for something quick to create for craft shows or a small gift for all your co-workers, you might like the Christmas Gang.

If you know me, you know that I love to bake especially at Christmas. It is just another form of art. These are my Baking Santas. There is only a little sculpting on the faces and hats and the rest is painting.

I was inspired by the sleigh made by DePalma’s to make this Flight 1224 design. You can make more reindeer, but I thought 5 was the perfect amount.

If you are looking for a gift for a pet loving friend, you might enjoy making my Pet Park Pals Tic Tac Toe box.

If you are sentimental and have family teacups or vintage Jello Molds you might want to make these sweet angels. They would look great on a tree or hanging out all year.

I made another smaller sleigh that you could use for Christmas called Polar Pals, but also let out all winter.

You can find a link to my new patterns here: Sculpting E-Packets (janeallencreates.com) and to the kits here: New Kits (janeallencreates.com)

My friend Shara Reiner was also busy doing new designs for NET. All of her designs are on DePalma’s Custom Woodcraft pieces

I love the three sets of ornaments that Shara created:

This packet has 5 ornaments plus the bonus Merry 2023 ornament.

These two vases are so much fun, and you can use them for so many different things.

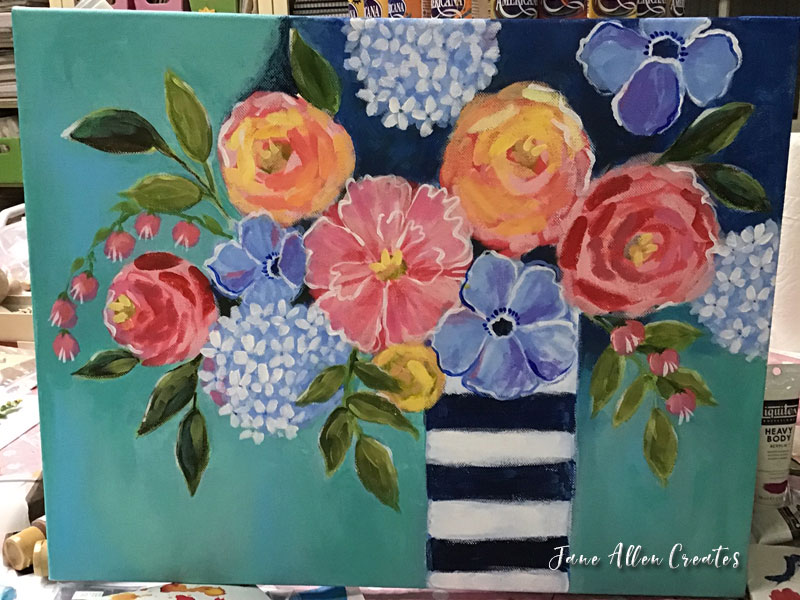
This is a beautiful flower box and I love how Shara finished it on the inside.

This tray has a bonus, not only do you get the Liberty design you also get the Give Thanks design that is on the back of the tray.

You can find Shara’s new patterns here: Shara Reiner E-Packets (janeallencreates.com)

We hope you are inspired by our new designs

Hugs,

Jane & Shara

Art, Designing, DIY

Up-Cycled Bunnies

One thing I have always enjoyed about decorative painting is the variety of surfaces. I love all the different shapes. Many times for me, just looking at a shape gives me an idea of what to put on it. This happened to me when I was looking into the recycle bin at these two different shaped bottles. I immediately saw bunny bodies.

mouthwash bottles

I envisioned using Styrofoam balls for their heads and QuikWood (QW) to create the details. I applied pieces of newspaper with DecouPage to the bottles. Once it dried, I covered the bottles with a coat of Gesso.

Then began the process of adding the head and sculpting the details. I chose a Styrofoam ball that is in proportion to the size of the bottle. For the rectangular bottle I used a 2 1/2″ ball and for the larger bottle I used a 3″ ball. Since this was my first attempt, I used the bottles the way they were made. If I did it again, I might cut off a part of the top of the large bottle with a hack saw to make the neck shorter.

The first thing I did was sculpt the ears and let them cure. Again, I made the ears in proportion to the size of the bunny. Of course, bunnies can have all different size ears so don’t over-think it. To make it easier you can download the pattern below. Lay a piece of parchment paper over the pattern and follow the instructions on the video. For the larger ears I used 1/2″ of QW and divided it in two. For the medium ears I used 3/8″ of QW and divided it in two.

Video for making ears:

Bunny Ears

If you want to make the bunnies a little heavier, you could add some sand or stones to the bottles before adding the heads. I did not add anything to mine.

Once the ears are cured, I pushed the Styrofoam ball down on top of the neck of the bottle. I then covered the head with clay and inserted the ears.

For the large head I used 3″ (2″ to start and then 1″ rolled into a 6″ coil to finish) of QW to cover it and for the medium head I used 2 1/4″ (1 1/2″ to start and then 3/4″ rolled into a 5″ coil to finish) of QW.

Making head and inserting ears

I then added the feet and the tail. For the larger bunny I used 1″ of QW for the tail and 1″ divided it in two for the feet. For the medium bunny I used 3/4″ of QW for the tail and 3/4″ divided it in two for the feet.

Bunny feet and tail

I them added a muzzle using 1/2″ of QW for the large bunny and 1/4″ of QW for the medium bunny.

Bunny muzzles

Once you have your sculpting done you will want to cover the QW with a coat of DecoArt Adhesion Medium mixed 1:1 with DecoArt paint. I usually use Oyster Beige because it is a little lighter than the QW and I can see where I painted. If you haven’t already done so, you will want to paint the paper with gesso.

I then sketched out how I was going to dress my bunnies.

Sketching out bunny clothes

At this point you could decide if you want any more sculpted details. I begin painting my bunnies and then decided to add a few more details. I used DecoArt paint for my bunnies. I recommend using your favorite colors.

I then decided to add a flower and carrots to the square bunnies and arms and a heart to the larger bunny.

Flower and Carrots
Arms and a heart

Once they were painted, I gave them a light coat of DecoArt matte varnish. I then added a few embellishments.

Once I finished these bunnies, I started seeing other containers that could be bunnies as well.

more containers, more bunnies
More bunnies, even if one is a duck pretending to be a bunny.
bunnies
bunnies

I hope you will have fun creating more up-cycled bunnies. If you create some, please send me pictures at alandjanie@msn.com and I will add them to the bottom of this post.

Happy Spring, Happy Easter!

Hugs,

Jane

Art

Angel House & Bakery Zoom Class & More

In 2020 I created a paper mache glitter house called Shimmy Down the Chimney, where Santa is wedging himself down the chimney while Rudolph is going through the front door. The original pattern was in the Winter 2020 issue of the Decorative Painter. If you don’t have the magazine, you can find it here: Shimmy Down the Chimney pattern.

This year I decided to make two coordinating houses – an Angel house and a Bakery. I will be offering them as a zoom class. Below is the information on the class and also the supplies you will need for class. Of course, you can make it your own by using some or all of the supplies that you have on hand. To make it easy for you I do have most of the supplies for sale on my website which you can find here: Angel House and Bakery zoom class. We hope you will join us for class.

Angel House and Bakery Zoom Class
Read more: Angel House & Bakery Zoom Class & More

Angel House & Bakery Zoom Class

November 10th

12:00 Noon – 5:00 PM EST

$50

Class Supplies

  • Hobby Lobby Paper Mache Sm & Med houses
  • QuikWood 2 – 2 ounce    
  • Diamond Dust Glass Glitter
  • Posca Paint pens  -PC-5M, PC-3M
  • Buttons – blue mix & pink, teal, white mix
  • Star clay cutters
  • Brick stencil – Tim Holtz Mini Stencil – Set 3
  • Star stencil – Tim Holtz Layered Stencil – Hocus Pocus
  • Snowtex
  • White glue & Superglue Gel
  • Normal painting & sculpting supplies
  • House Kit:
    • Styrofoam cone 1  – 2” x 3” 
    • 2 – 4” skewers
    • 1 – 1/8” dowel – 3”
    • 20 gauge wire
    • Silver tinsel – 2 ½’
    • 140lb watercolor paper 1 ½” x 2”
    • Toothpick
    • Embossed tin – 5 ½”

Note: Class will be recorded.  We will do the sculpting in class, and you will paint and assemble on your own.

To sign up go to www.janeallencreates.com

I just got back from New England Traditions where I taught two fun classes- Peter Pumpkin and Hooty, and Kids in my Hair. Many people were asking about the patterns, and you will be able to find them on my website and also kits for Peter Pumpkin and Hooty.

Kids in my Hair Pattern

She is made with a 100mm disk (about 4″) that you can find at Hobby Lobby and Michaels.

I also taught in August at Las Vegas for the SDP 50th anniversary convention. I taught two classes; Prancer & Dancer and Lillian and Luckie. I have the patterns for both and the kit for Prancer & Dancer.

Lillian and Luckie pattern

This is also made with a 4″ disk.

I came out with a number of new patterns for Vegas which are on my website www.janeallencreates.com along with the kits. You can find the patterns under the Books/Patterns tab and then under the Sculpting patterns link. The kits can be found under Product, Sculpting Pattern kits.

I have also updated my website with some patterns and kits of designs I have taught in the last year:

Hope you enjoy these designs.

Blessings.

Jane

Art

Some Classes in 2022

Hello Everyone,

It has been a while since I posted what I am up to with New Projects and teaching. In all of these classes I will be teaching you how to sculpt with QuikWood, which is a two part resin.

In May I will be teaching the kickoff class for the Artroom2Create online retreat as well as another project during the retreat. The Kickoff class is called “A Colorful Gathering of Friends” and you will sculpt these three fun birds and two bees. The class is free, but you need to purchase the kit. The kickoff event is THURSDAY, MAY 19, 2022 10 am -2 pm EST.

I will also be teaching these two snowman ornaments called “Dancing Snowies”. This class will be on SATURDAY, MAY 21, 2022, 10 am – 2 pm EST.

To sign up for these classes, you can go to the Artroom2Create website and click on the tab for the retreat.

I know these are very soon and you might not be able to get everything you need by then, but the good news is the classes are recorded and will be available for 90 days.

Colorful Friends
Dancing Snowies

On June 14th, I will be teaching a zoom class for the Artful Webinars ornament series. I will be teaching Bow Wow & Meow, which is a cute dog and cat ornament. We will be sculpting both ornaments in class. You can paint them like I did or personalize them to look like your favorite pet. For more information on the class go to the Artful Webinars website.

Bow Wow & Meow

I will be teaching at the SDP 50th Anniversary Convention in Las Vegas Aug 7-11. To get all of the information on the convention go to: SDP Convention. Shara Reiner and I will also be having a booth there, so we hope you will stop by the Trade show. These are the projects I will be teaching there:

Prancer and Dancer
Lillian and Luckie

I will also be teaching at New England Traditions this year which is in Marlboro, MA October 4-9. I will have a booth there as well and will be doing make-it and take-its. To find out more about the convention go to NEW ENGLAND TRADITIONS Decorative Painting Convention.

Peter Pumpkin
Kids in my Hair

I hope we get a chance to create together this year.

Hugs,

Jane

Art, Decorating

Merry Christmas 2021

It is hard to believe that 2021 will soon be coming to a close. I just wanted to take a few minutes and wish everyone a Merry Christmas and a blessed New Year.

Last year I did not decorate very much because of Covid, but this year I took some time and decorated a little. I thought I would share my home with you this year.

At my front door I have two angels by my door. I had painted these many years ago to go with a nativity that I had painted. I have since given the nativity away but still have the angels. The nativity was a Juliet Martin design and I painted these to go with it.

If you haven’t guessed already, I love angels. This grouping by my front door are byers choice angels and the angel tree is a Rosemary West design that I painted.

I put up a lot of small trees this year. I love seeing all the lights dancing through the house. Here are some pictures of the trees in the living room and dining room.

This one is by my front window and has angels on it. The angels were painted by Shara Reiner and Jane Lazenby.

I call these dolls my aunts because I made them to look like my beloved Aunts. They were a Christmas present to them many years ago and after their passing they came back to live with us. They are a sweet reminder of two beautiful people in my life.

A few more pictures of things in my living room/dining room.

In my family room, kitchen I put up a couple of trees. My main tree was all done in reds, white, silver and gold.

This year I painted Lynne Andrew’s 12 days of Christmas ornaments. Only problem was that I chose larger ornaments and they were heavy, so I had to tuck them back on the branches.

I loaded my mantel in my family room with holly and trees. I wanted to have the trees at different heights so I used pretty spools of ribbon under some of them. I was happy with how it turned out.

Here are some pictures of other things in my family room and kitchen:

I put a little tree in each bedroom, so that their would be lights in all the windows.

In my middle bedroom I was inspired to paint some ornaments after watching Andrea Garvey’s video on YouTube:

They were so much fun! Andrea is very generous; I have taken a number of classes from her. She is a great teacher, and her things are fun! You can find the link to the video here: Andrea Garvey Ornaments

I also put a few pink trees in my studio. The new one is LED and it is bright!

Like for so many of you it has been a bittersweet year for us. Last November my husband’s brother Rick came to live with us. With the help of Hospice we were able to care for him for 7 weeks until he took his last breath on Christmas eve. It was a special time for all three of us and we were so glad that we had that time together.

Rick was a big guy with a kind heart. He always loved adventure, the great outdoors, he was an avid reader and loved good food. He has been and will continue to be missed. This picture was taken many years ago shortly after we met. I am between my husband Al and Rick (right).

We hope you enjoy the tour of our home this year. We wish you a Merry Christmas and a blessed New Year.

Big Hug,

Jane and Al

Art, Shara Jane

Santa Pop Up Toy Ornament

When I was asked by Sue Bowers of the Society of Decorative Painters (SDP) to design an ornament to teach in their academy in November I thought of this design that I had in my sketch book. This ornament is reminiscent of a vintage pop up toy were you would pull down on the stick and Santa would disappear, and then you would push up on the stick and voila Santa would appear.  Even though this toy is stationary and designed as an ornament, it is a reminder of those simpler times and toys. 

People started signing up for the class before I was even aware that it was posted on their site. I found out that people who subscribe to the Decorative Painters Academy newsletter receive advance notice of classes. Usually a day or two earlier. If you want to be in the know right away you can sign up for the newsletter by going to their website www.decorativepaintersacademy.com. When you go to the site you will see a pop up box to sign up.

Class Info:

Date: Wednesday, November 3rd, 2021
Time: 11 am – 2 pm Central Time
Where: Online virtual class via Zoom
Cost: $30 Members, $40 non-members

If you are interested in the class or would like more information you can go here: Pop up Santa Toy Ornament.

I am also selling kits and supplies for class if you need them. My website is www.janeallencreates.com

Did I tell you that I created a companion piece to go with Santa? Here is a sneak preview. I will be teaching this cute snowman in January. Stay Tuned.

Happy Creating my Friends,

Jane

Art, Shara Jane

Shara Jane Holly Jolly Santa is Back

In April of 2020 Shara and I had planned on doing two live in person retreats to create our Holly Jolly 38″ Santa. One was going to be in California the beginging of the month and the other was to be in Pennsylvania the end of the month. Everything was going along smoothly and then covid hit and we had to regroup. We ended up quickly deciding to do a virtual self-paced class with a private Facebook group.

Many people were disappointed that they were not able to take the class and have been asking us to do it again. We listened and we will be offering the class again in April of 2021. The class will be April 23, 24, and 25, 2021.

The Santa is cut from wood and embelished with Quikwood. No experience needed. We will teach you the basics of using Quikwood. Each day we will have a zoom meeting so that we can go over things and so that you can ask questions. We have step-by step videos on a web page that you will also have access to. You will be able to watch a video and then do that step. You will have access to the videos indefinately. Shara and I will be monitoring the Facebook group and you can ask questions there or email us during the class.

A number of people would like to put the class on their Christmas list so that someone can buy it for them. Here is a link to the class on my website: https://www.janeallencreates.com/product-p/21500.htm If someone is ordering it for a gift, ask them to place a note on the order and I will be able to send them a digital gift certificate. Also, if they are ordering it for you, have them use your contact information in the shipping area because that is what we will use to ship the kit.

Holly Jolly Santa Virtual Class

Zoom/Self-Paced

April 23, 24, & 25, 2021

$325

The price includes the class fee, class kit and shipping the kit. It does not include the tools, paint and mediums to complete the project.

Link to purchase class: https://www.janeallencreates.com/product-p/21500.htm

We hope you will join us this April to make Holly Jolly Santa.

Shara and Jane

Art

Woodsy Santa Zoom Class

Shara Reiner and myself will be presenting another Zoom class on November 15, 2020 with this Woodsy Santa and his friends. Santa has just gone into the woods to get the perfect tree and meets up with his woodsy friends, a sweet little bunny, a cute raindeer and a very wise owl friend. They look so cute on thier cart. This is a sculpting and painting class. We will be recording it and will have a private facebook group for you to share with the other people in class.

Continue reading “Woodsy Santa Zoom Class”
Art

Shara Jane Fall Ornies

Last spring Shara Reiner and I were all set to have a retreat in California and Pennsylvania to make our Santa when Covid hit. We were able to have the retreat virtually. One of the things the ladies said they would like to see in the furture is something for fall/Halloween. So we put our heads together and came up with a series of ornaments.

We are offering three classes where you will make 3 ornaments in each class. If you sign up for all three of the classes we are not only offering discount pricing, but a free week of class with three more ornaments.

The first class will be Sunday October 11th from 1- 6 ET (12 – 5 CT, 11-4 MT and 10 – 3 PT). This is a great beginner class if you have never sculpted. Meet Sylvester, Corny and Hooty.

The second class will be Sunday October 18th at the same times. This class will add a few more skills to your sculpting resume . Meet Rosie, Special Delivery and Hilda.

The third class will be Sunday October 25th at the same times. You will be an old pro with sculpting by this time . Meet Squiggy, Acorn Hair and Sam.

The classes are $55 a week, but if you buy all three classes it will cost $155 and you will get the forth free. The kit for all 4 classes is $72 and for any of the weekly classes the kit is $27. shipping is inculded in the kit prices. The kits include the supplies you need to make each of the ornaments (Quikwood, Styrofoam, wire and asorted dodads).

The free class will be November 1 at the same time. By this time it will just be a sculpting party. Meet Button Boy, Harvest, and Boo.

The classes will be Zoom classes, but they will also be recorded. There will be a private FaceBook group that they will be posted in, plus you will be able to share all your creations in the group. The patterns also include a link to a facebook page with step by step photos for the videos.

Today Shara and I did a live chat to introduce the project and also share some ways that you can decorate with the ornies, such as putting them in a basket, on a tree, a cone or a container. During the classes we will be sharing other creative ideas to do with them. You can find our live chat on our FB page Shara Jane & Friends We would love to have you come over and join us.

Shara showed another creative idea on making holders for the ornaments out of toliet paper rolls. She also used the inside of a coffee pot for the other holder. Check out the video replay to get the full scope on these.

Purchasing Details:

You can purchase the classes and kits by going to my web site www.janeallencreates.com and clicking on the menu item Shara Jane, Zoom Classes, Fall Ories. You will then find a list of the different class and kit options and any additional supplies you might need for class. Here is a direct link to the page Fall Ornies

When you finish purchasing the classes there will be a download box so that you will be able to download the pattern. If you miss it contact me and I will email it to you. (alandjanie@msn.com).

Here is a sneak peak of another blog class that we will be doing Nov 14, 15. We will provide more details later.

Shara and I want to thank you for coming out and chatting with us. We are loving all the positive response from you.

Big Hug,

Shara & Jane

PS. Some people were asking about our headpieces, you can find them at Grandinroad.

The checked garland on Shara’s Tree was from Hobby Lobby.

I got my pom pom garlands from Etsy.

The one on this tree I got from Gracie and Marie, in which I picked custom colors: Orange, tangerine, goldenrod, chartreuse,turquoise, camel

This one below is from the Rainbow Barn.

Art, Baking

Time for Strawberry Pie

When I started thinking about it, I realized I have been making this pie for over forty years.  When I was leaving my first job with state government, one of my co-workers, Bonnie, made this pie for my going away party.  Her husband was a chef and she got the recipe from one of his French cookbooks.  Needless to say it was a big hit and I have been making it ever since.

Continue reading “Time for Strawberry Pie”

Art, Inspire

May Flowers

I have always enjoyed flowers.  My mother always had big beds of flowers and now my husband keeps me in paradise, as he likes to say, by planting lots of beautiful flowers in our yard.

As an artist I have enjoyed painting flowers and I am drawn to a loose style.  I also love to decorate my home with my art as well as other peoples art.  I recently discovered C Brooke Ring’s art on Pinterest.  At the time she had many paintings for sale and I bought this one for my family room:

!brookepainting

Here is a time lapsed picture of her painting “my painting”. I love seeing all the layers and details as they are added.

Recently Brooke has offered painting classes.  They are about two hours and you can paint along with her.  They are a Zoom class so you can ask questions during the class.  Once the class is over she posts them on YouTube. If you are having trouble keeping up you can go back and paint and pause at your own pace.

You can find the classes here: https://cbrookering.com/collections/workshops

paintingclasses

I took the two flower classes and I am thinking about taking the other two.  I also have a feeling that she will be posting more in the future,

The first flower class I had sign up for was after the Zoom class went live so I just painted it using YouTube.  I thought I would show you how it went for me.

This is how my under painting looked after the first hour of class.

!c1underpainting

After the second hour of class this is how my painting looked:

!C12

The next day I went back and worked a little more:

!c13

I set it on the mantle in our family room and kept looking at it.  So I made a few adjustments.  I would still like to keep working on it, maybe even paint it again.

!c14

The second class I was able to do it through Zoom.  So here is my painting after the first day of class:

!C21

The next day I made some adjustments.  I would like to do a little more with it as well.  I think adding a few more layers makes a difference.  Also taking a break and just looking at it helps.  It is not so much about making my painting look like Brooke’s, but it is about me being happy with what I am doing and finding my own style in the process.

!c22

Please note these classes are for your own practice and enjoyment, and are not to be recreated for sale or distribution.

Brooke is a very generous artist and offers many tutorials and videos on her YouTube Channel: https://www.youtube.com/channel/UCIJI_65DmDZPXWEwWp05IrQ

I do not work very much with tube acrylics, but I enjoyed the classes and learned a lot.  I encourage you to check out her classes. They  are a lot of fun.

Hugs,

Jane

Ps.  Here is another picture of my painting on my mantle.  Notice the same picture in front of it. I got it from Bethany Joy.  I definitely like happy colors.

!finished

Art, Inspire

Busy Hands – Happy Heart

In the evenings I like to sit with my husband and watch a little TV. Probably like most creatives it is hard to just sit there, so I need something to do with my hands.  I wanted to find something that would keep my hands busy but not over stimulate my brain and keep me from being able to sleep.

I admire Michele Palmer’s art work and am friends with her on Facebook.  She was advertising a punch needle class that she was teaching in Mumford, NY.  I immediately loved the projects because she took her designs and use of color and turned them into punch needle designs.   I convinced my husband that this would be a perfect birthday gift for me and how far could Mumford, NY be from Harrisburg, PA, anyway?

projects

Continue reading “Busy Hands – Happy Heart”

Art

Shara Jane Santa Retreat

Would you like to spend some uninterrupted creative time with like minded artsy ladies.  Well Shara and I have just the thing for you.  We are planning two retreats in April 2020, one in California and the other in Pennsylvania.  The main project for the retreat will be this 38″ wooden Santa that is embellished with Quikwood.  We will also have some other goodies to keep you busy.

Continue reading “Shara Jane Santa Retreat”

Art

NEW Shara Jane from Las Vegas

Isn’t it funny how spending time with friends creating can turn into something new and wonderful.  Last summer Shara Reiner and I got together to play. Our plan was to create some of her birds dimensionally using Quikwood along with other things.  The first day started off a little slow with each of us trying to see the others vision, but the next day that all changed.  We were sculpting angels, Santa’s, and snowmen.  We had so many ideas that we couldn’t keep up with ourselves.  We sculpted from morning to night – it was a creative high.  And then Shara said we should turn these into patterns and Shara Jane was born.  We came out with our first set of patterns last fall.

Continue reading “NEW Shara Jane from Las Vegas”

Art

Glitter House Gold

This year my friend Mark Vickrey, who owns Blooms by Vickrey, asked me to do some glitter houses for his shop.  I did some traditional houses like other years,  and I also did some beach houses; but I wanted to do something different.  I decided to do some white houses with gold roofs.  I painted them with DecoArt Warm White and the roof and base with DecoArt Dazzling Metallics Emperor’s Gold.   I then used glass glitter on just the houses and used a red ribbon on my wreaths.  For more details on creating glitter houses you can go to:

Continue reading “Glitter House Gold”

Art, Cooking

Chicken Pot Pie

My husband has a friend Gary who likes chicken pot pie, so I have been trying some different recipes.  One day when I was cleaning up my studio I found an older copy of Cook’s Illustrated magazine folded open to this recipe.  The magazine was dated February, 2006.  The intro said that it is a lot of work but worth it.  Since my friend Shara was coming that week, and I knew that she liked chicken pot pie, I thought I would give it a try.  Funny how things work out. 🙂

Continue reading “Chicken Pot Pie”

Art

Wendy & Kevin Young Benefit Seminar

This past weekend my painting chapter, Penn’s Woods Painters, Amy Mogish and myself did a seminar to bless Wendy and Kevin Young.   Wendy is a very talented, sharing, sculpting artist and many of us have been blessed to be able to learn from her. In February her husband Kevin became ill and is now disabled. It has been financially devastating for them  and as fellow artists we wanted to do something to help them.

Continue reading “Wendy & Kevin Young Benefit Seminar”

Art, DIY

A Heart for Mom

I am loving spring with all the beautiful scents and colors.  I love seeing the trees budding and all the beautiful spring flowers popping out everywhere.

All the beautiful spring flowers have me playing with Quikwood again (see Flower Canvas).  I thought it would be fun to create these flower hearts.  They are a sweet little gift for mom and/or anyone special in your life.  They would also be fun to hang on someone’s door as a little surprise.

Continue reading “A Heart for Mom”

Art, Inspire

Pictures to Draw From…

Not too long ago we talked about keeping a sketchbook  which is an invaluable tool for an artist to keep quick sketches of ideas, resources, and to just practice.  Another thing that I do is keep a photo reference file.  I tear out pictures from magazines, and sales catalogues that inspire me.  I organize them into folders so they are easy for me to find when inspiration strikes.

Continue reading “Pictures to Draw From…”

Art

Quick Egg Bunny & Chick

When I was playing with my other Egg Bunny and Egg Peep, I thought I should do a couple that are simpler like I did for my Egg Nativity and Egg Snowies.  So I came up with a couple for you.

I know what you are thinking. Even though these are quick, Easter is a day away and I have a lot of other things to do.  But they are not just for Easter. Think spring, or favors for a wedding or baby shower or a tea.  They could be painted in other cute colors and you could easily add the place card holder/ornament hook like we did in the egg nativity.

Continue reading “Quick Egg Bunny & Chick”

Art, DIY, Inspire

Creative Flower Challenge

I always enjoy spending time with creative friends.  These times usually involve food and catching up with what’s going on in our lives.  Some of the things I really about being with my creative friends is sharing ideas and creative brainstorming.  My creative friends help fill my well when it is dry, they encourage, and they get/keep me excited about my art.  Sometimes we have so many ideas I think my head will explode…and I love it!

The other day I was with my creative friend Glenda Payne and she suggested each of us do a large floral canvas.  One thing lead to another and we decided to do 10 floral canvases and hold each other accountable.

Continue reading “Creative Flower Challenge”

Art, DIY

Egg Snowies

This year at Christmas we created Nativity characters made from paper mache eggs and Quikwood.  If you want to see them you can go here – Egg Nativity.   They were fun to create and we added a hook at the top that could be used as a hanger or a place card holder. On that post I also had step-by-step videos.

As I was packing them up I thought this same concept could make some great snow people…and so I started playing.

Continue reading “Egg Snowies”

Art, Inspire

Merry Christmas 2017

Well it is hard to believe Christmas is almost here again.  Normally I would be giving you a tour of my house, but I realize that my home doesn’t look much different than other years.

Yes, every year I try to bring out different trees and decorate them a little differently,  but I find I keep going back to my favorite things.  So I thought I would give you a little peak into my home, a couple of new things (or at least arranged differently) and those favorites.

Continue reading “Merry Christmas 2017”

Art, DIY

Egg Nativity

I was talking to my cousin about her Christmas dinner and how she would like to have the “Reason for the Season” somehow on her table.  As we were brainstorming, the idea popped into my head to make nativity characters out of papier mache eggs and Quikwood.  The characters could be place card holders for dinner and then be taken home and hung on the Christmas tree.  Each year that ornament would stir the memory that was made with it.

Continue reading “Egg Nativity”