
Egg Peeps might seem a little strange unless you have been following my blog this year. Earlier in the year we made nativity ornaments / place card holders out of paper mache eggs. Then we made snow people also using the paper mache eggs. If you would like to see the older posts click below:
It wasn’t exactly a plan, but now I am making peeps using 2 1/2″ eggs. This time I am using Styrofoam eggs. If you would like to use paper mache eggs, you will need to drill a hole for the legs, otherwise everything is the same.

Before starting I thought I would give you some basics of using Quikwood in the video below. Please remember to take off your rings before using Quikwood
I will be providing brief instructions in my step-by-steps. You will find more details in the videos
- To start you will need for each peep a 2 1/2″ Styrofoam egg and two 2 1/4″ lengths of a 3/16″ dowel.
- Position and then push the dowel into the egg about 3/4″ deep.
- Cut and mix 1/4″ of Quikwood. Divide in two and roll into 1″ coil.
- Wrap around each leg and blend into egg.


Adding Feet Video:
- Cut and mix together 1/8″ of Quikwood for beak and eye.
- Pull small piece off the size of an 1/4″ ball. Shape remaining Quikwood into triangle and attach to face. Reshape once attached.
- Divide ball in two and roll into balls. Attach above beak.
- To open mouth allow beak to sit 10 to 15 minutes. Using exacto knife slit mouth on each side and separate with blade. Use fingers to reshape beak.


Beak and Eyes Video
- Place peep on parchment paper and mark placement of feet.
- Cut and mix 1/4″ of Quikwood, divide in two, Then divide each piece in three.
- Roll first piece into 3/4″ cone shape and place thicker end over marking. Roll two more cones and place beside center piece. Squeeze together at back. Repeat for second foot.
- Align peep on top of two feet and press into feet. Allow Quikwood to set. Prop if needed to keep peep straight.
- When the Quikwood has set cut 1/8″ of Quikwood. Mix together, divide and roll into 1″ coil.
- Place coil around foot and blend into foot, then into leg. Repeat for second foot.


Adding Feet Video:
- Cut and blend 1″ of Quikwood. Divide into two.
- Divide one piece into two for wings. Roll into 1″ cone shape.
- Attach and press wider part to body, shape as desired.
- Roll remaining piece into a ball and press to back of peep for tail.
- Blend to body and then shape tail into V-shape, tipping tail upward.
- If your birds are not standing straight add a little Quikwood to either the back or the front of the feet and blend.


Wings and Tail Video:
Once everything was set I added DecoArt MagiKote to the Styrofoam following the manufacturers directions. I added three coats allowing it to dry between coats.

You can paint these cute peeps any color you want. I used the following DecoArt colors for mine:
- body – Sunny Day
- feet & beak – Tangerine
- Eyes – Ocean Blue, Soft Black, Snow White

I then sprayed then with a coat of DecoArt Matte spray sealer.
I wanted to antique them but did not want them to be too dark so I mixed Raw Sienna with DecoArt Antiquing medium. When it was dry I sprayed with another coat of sealer.

When I started I was making these cute peeps for Easter, but I could also see painting them a little differently to be baby birds for spring.

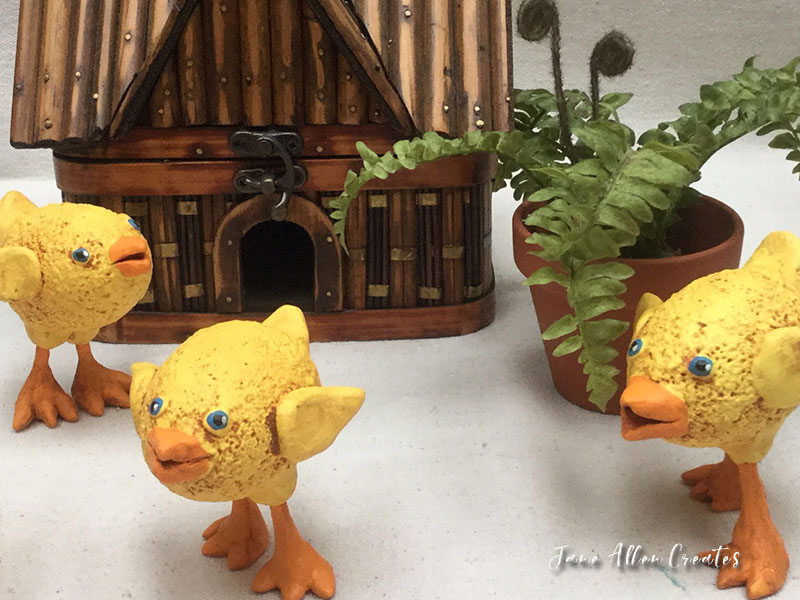
I hope you will enjoy creating these little peeps, they make me smile every time I look at them.
Happy Creating,
Jane
Oh, Miss Jane, they are adorable!
Thank you Charlotte
Happy Easter
I absolutely love your egg peeps Jane! The video tutorial is brilliant. Happy Easter 🙂
Thank you Effie, happy Easter to you too
You are one fun “CHICK” ! These are adorable. Thank you for sharing. Happy Easter to you and your PEEPS!
Thank you Lynn, happy Easter to you too. Love how cleaver you are with words
They make me smile! Thank u!
Thank you Amy they were fun to do. Happy Easter
Jane, these chicks have so much personality. I am going to Michaels today to get the supplies to make some of these for my tables on Easter Sunday. I’ll let you know how I do. You inspire me so. I am off to have some fun!
Thank you Margaret, enjoy the funof creating. Happy Easter