
I always enjoy spending time with creative friends. These times usually involve food and catching up with what’s going on in our lives. Some of the things I really about being with my creative friends is sharing ideas and creative brainstorming. My creative friends help fill my well when it is dry, they encourage, and they get/keep me excited about my art. Sometimes we have so many ideas I think my head will explode…and I love it!
The other day I was with my creative friend Glenda Payne and she suggested each of us do a large floral canvas. One thing lead to another and we decided to do 10 floral canvases and hold each other accountable.
We would love to have you join us. The rules are pretty much “there are no rules.” We want to just play and create without having to make it perfect. You can paint on any size canvas or surface, and use any medium with no set time frame. For myself I want to try some different things…hopefully I will stretch myself a little, but more importantly…just play and enjoy the process.
The first thing I did was look at some of my flower pins on Pinterest. This is the project that inspired me for my first flower project. It is by Laura Lohmann and here is a link to her blog with the project: http://www.paintedpaperart.com/2017/04/clay-flower-bouquets/
 I loved the dimensional look. Laura used air drying clay. I decided to use Quikwood. Quikwood dries in 20 minutes and I think you can get more detail with it.
I started with a 8″x 8″ x 2″ wooden canvas from Dick Blick. For the project I thought it would be fun to use DecoArt’s Premium tube acrylics. For this project I started with: Carbon Black, Cobalt Teal Hue, Dioxazine Purple, Green Gold, Primary Yellow, Ultramarine Blue. Sap Green, Titanium White, and Yellow Green Light. I draw a vase on the canvas.

I liked how nice the tube acrylics were to work with and blend. I created a darker area behind where I was going to put the flowers. I used an old brush that my kids paint with for the stripes. I like the ridges you can see in the stripes.

Once I had everything based in I layed a piece of tracing paper over the canvas and sketched in the flowers. I then used a chalk pencil and loosely sketched on placement on the canvas.

I then began building the project with the Quikwood. If you have not used Quikwood it is a two part resin. Once it is mixed together it will set in about 15 to 20 minutes. To keep it from sticking to your hands use Avon Care Silicone Glove hand cream before starting and periodically during sculpting. You can also use DecoArt Extender to blend the clay as needed. You can see a little more about working with Quikwood on these posts: Egg Snowies, Egg Nativity. Normally you would be able to get your Quikwood from Wendy Young, but right now her etsy shop is temporarily closed. Another place is Cupboard Distributing.
I cut a 3/4” piece of Quikwood for the hydrangea. After mixing I rolled it in a ball and then flatten it and laid it on the surface. I pulled it out to the edges keeping it higher in the center.
For the little drop flowers I cut a piece of Quikwood about 1/2″. After mixing I pulled off a pea size piece and rolled it into a cone shape (See top left shape). I made each flower a little smaller as I got to the end of the stem. Using a sculpting tool I place an indent in end of each flower. You could also use the sharpened end of a pencil and insert and roll it.

I still had some Quikwood left so I painted the stems for the small flowers on the top left. I then made very small balls and put in place. I used the end of a paint brush to indent the centers. Sometimes when trying to attach something so small the Quikwood wants to stick to you fingers instead of the surface. If needed, squeeze a little gel super glue on the surface to attach it.

I painted the rest of the leaves using the three shades of green and a little of the Cobalt Teal Hue. I painted the hydrangea with Dioxazine Purple, Ultramarine Blue and Colbalt Teal Hue.

To make the roses I cut 1/2″ of Quikwood and divided the ball into three unequal parts. I then rolled three coils between 4″ – 5″ . I flattened them using the palm of my hand. I laid the coils on a piece of parchment paper and used extender on my palm to flatten them. To make it a little easier to roll the roses I let the clay sit for about ten minutes

I then started at one end and rolled tight to start (See bottom).
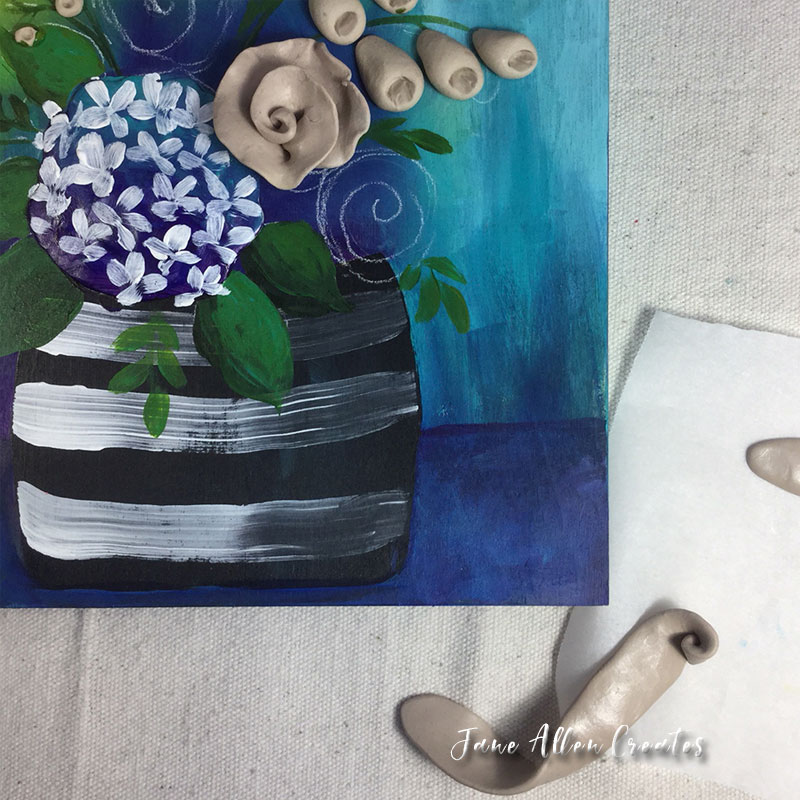
I continued rolling more loosely so the petals extend out. I then place the rose on the canvas gently pushing in place. I then allowed the clay to set a few more minutes. Using my fingers I gently ruffled the edges of the rose (see top rose that is unruffled and the bottom one which is ruffles). When starting you might want to do one rose at a time.

Before adding the petals to the hydrangea I Stroked on Titanium White petals.

I then cut off about 1/4″ of Quikwood and began making small cone shaped petals. I placed the petals in groups of three or four. Have some petals flat and others standing on end. If needed, cut small pieces of Quikwood and mix to finish.

At this point I thought it would be easier to use my DecoArt American Acrylic to finish. I used the following colors on the project: Blue Haven, Cadmium Yellow, Dioxazine Purple, Evergreen, Foliage Green, Indian Turquoise, Pineapple, Razzle Berry, Soft Black, Spiced Pink, Warm White, Whispering Turquoise, and Wisteria.
I painted the hydrangea petals Indian Turquoise at the top, Blue Haven in the middle and Wisteria at the bottom. I then went back and dabbed some of each color on the adjoining petals. I painted the little flowers Warm White, the roses Razzle Berry and the cascading flowers Pineapple.

I shaded the back and inside of the yellow flowers with Cadmium Yellow and place Cadmium Yellow centers in the centers of the small white flowers that I indented. I placed Soft Black dots on both flowers. I floated Warm White over ends of petals on hydrangeas. I placed a Dioxazine Purple dot in the center of each grouping of petals on the hydrangeas and shaded the roses with Spice Pink. I lined the top of the roses here and there with Warm White.

I painted the veins and did some highlighting on the stems with the Foliage Green + Warm White.
Since I wanted to make the roses pink I thought I needed a little of the same color on my canvas so I used my palette knife and Primary Magenta (DecoArt Premium Acrylics) and put a little color on the table cloth and flower pot.

I thought I was done but noticed that I needed calyxes on my yellow flowers. I used Evergreen and used three small strokes to create each calyx. Once it gets a little warmer I will spray with a coat of DecoArt sealer.
I hope this project will encourage you to try some new things and just play.

I told you that my friend Glenda Payne and I are doing this challenge together. Here is Glenda’s first canvas:

I love how she did her canvas and the polka dotted edges.
We would love for you to join us on this challenge. When we are done I will do another post with all our finished canvases. I will be posting sneak peaks on my Jane Allen Creates Facebook page. I am sure that Glenda will also be sharing a few peeks on her page.
Happy Creating,
Jane
PS. Here is a copy of my Quick sketch if you would like to use it, but I am sure you will want to create your own fun designs.
How fun is that ! It turned out Beautiful!
Thank you Charolette it was fun to do.
I love your flower pot and the idea of using quickwood in a different way. Can’t wait to try it
Thank you Sandy, I hope you enjoy, please share your creations
What a wonderful idea. I really appreciate you sharing your ideas. Thanks Agnes
You are very welcome Agnes
This looks like fun! I love how you shaped the roses and the cone petals with the Quikwood. The finished project is amazing!!!
Thank you Effie, it was fun to do. I like making the flowers dimensional and the quikwood makes it easy…immediately attached and quick drying.